Sunday, August 18, 2013

Lovin' a Maxi Dress! OOTD

I know that if there was survey done on this blog of what specific clothing style has been highlighted the most it would be a Maxi dress/skirt hands down!  I just love them and how comfortable they are and how they can be dressed up or down so easily and year round :) And I love when I find them long enough to hit where I want them too....being 5'10" that can be a challenge. 

Since the weather has been SO gorgeous here in Cincinnati the last couple of weeks I have been able to wear some jackets (they are actually needed in the mornings and evenings!) which really pretty much never happens here in August so I have been taking full advantage!  I am a fall girl meaning I love the weather, the scenery, the colors, the smells, the clothing styles, the holidays, the food and just the entire season in general.  I have been a happy happy girl in my "fall like" days here lately :)


Dress: Matty M via Marshall's (I purchased this is two different prints - the MOST comfortable maxi-dress ever - LOVE!)
Denim Jacket: (old but still have them here unchanged for years ;) Old Navy
Sandals: The North Face (old)
Infinity Scarf: local boutique
Watch: Michael Kors white poly and gold tone mixed metal Runway Watch (available here)

I hope you have all had an incredible weekend! Now I am off to my oldest son's football game followed by "draft night" with my girls for our Ladies Fantasy Football league!  SO much fun, food, drinks and good times. Maybe this will be my team's year :)

XO
 Jessy  


Sunday, August 11, 2013

Recipe: Summer Salad (yes, I know it's almost fall! ;)

I LOVE to cook and eat - seriously!  You can catch me in the kitchen most times that you can't find me in my closet or shopping - okay, I am kidding!! ;)  Really, though, I am always trying to come up with yummy dishes that incorporate fresh whole foods and make great meals, snacks and side dishes. In other words dishes that taste amazing and keep me from reaching for other unhealthy options! 

So today I am going to share with you my version of a cucumber and tomato salad which I think is one of the best salads all year round even though it is most often thought of as summer salad. There are few key ingredients that I think make this one stand out from your run of the mill cucumber and tomato mix (which I still happen to love any way you put them together!).  

Enjoy and let me know what you think after you have tasted this for yourself :)


You will start with tomatoes and cucumbers (which I like to peel first) and I also like to add a red onion (mmmm..my fav!). For today's salad I purchase cherry tomatoes. Last week I used beef tomatoes and the week before I used a mixture of styles and sizes from my friend's garden. Point is, ANY tomatoes will work - just use what you  like :)


Whatever it is that you use, chop them up to a good bite size and place them in the bowl. How many you use is up to you. This was an entire 10.5oz package (about 2 cups) of cherry tomatoes.  

After the tomatoes I chop the cucumbers and then the onion. Again, how much of each is up to you. In this salad I used 2 larger cucumbers and 1 medium sized red onion. 

 Now for the "toppings" :)
I use about 1 tablespoon of chopped garlic, a tablespoon of olive oil (I like flavored olive oils like this garlic and basil one),  "pour" or two of Bianco Modena white condiment and a few "shakes" of dill weed. 
This is where I differ in my recipe from most you will find out there. Many people use olive oil and vinegar, but I think the difference is using the Bianco Modeno. Bianco Modeno has the same ingredients as Balsamic Vinegar of Modeno but using all white ingredients. 
Here is a link to purchase one on line. I purchased mine at Kroger and bought their "store brand" called Private Selection. I think any brand will be just fine. I do store mine in the fridge after opening, but I don't know if that is necessary - just an FYI.

I also add salt and garlic salt to taste even though I forgot to picture those!


 After adding in all the "toppings" I stir it all up with a big spoon and viola - yumminess!!!

 I make this at least once a week and it usually lat very well in the fridge for 2-3 days.

I also wanted to mention my favorite and inexpensive knives that I LOVE from Target!  I have a much more expensive knife block full of knives that I really do not even use anymore. I packed the knife block away originally because of my young children and had purchased a couple of these (they come with covers) to keep in a basket in a high cabinet that they can't reach. I quickly realized how great they were and I wish I had known about these years ago!  I would have been using these all along.

 These are the two sizes that I use the most often although I do have 2 smaller sizes, as well. This larger and and a slightly smaller knife cut everything from watermelon to tomatoes to onions and apples. 

(for reference the knives pictured are the 7" Santoku - green and the 6" All-Purpose knife - yellow/orange)


Recipe in full: 
  • 2 Large Cucumbers (or any amount that you like!:) sliced into bite size pieces
  • 2 cups of cherry tomatoes (or any amount that you like!) cut in half
  • 1 medium red onion - sliced thin and chopped in half
  • 1 Tbsp of olive oil (I use garlic and basil flavored)
  • 1 or 2 turns in the bowl of Bianco Modena (I just add this into the bowl and taste until it is "right")
  • 1 (or so) Tbsp of chopped garlic
  • salt
  • garlic salt
  • dill weed (I just shake what looks like a good amount to me on top before mixing up ;)
I toss all the above into a large bowl and mix it up well before serving and enjoy! Store in the fridge for up to 3 days.  

XO 
Jessy 


Wednesday, August 7, 2013

The NEW kitchen - remodel on a budget!!

Okay, many of you may have seen my previous 2 posts about my new home and the work we have done on it since moving in to make "our own".  You can see them here and here in case you missed it.

We have remodeled and/or updated pretty much every room on the main level (I have still yet to show you the powder room, dining room and mudroom/family center :). It only took us about a month - thank, God because living here through construction with 4 children was not fun - and I am so happy with they way everything turned out!

So without any further delay let me show you a peek at my new kitchen:


Now let me know you the "BEFORE" picture of a similar angle:

Now let me show and tell you what we did to change the look!  
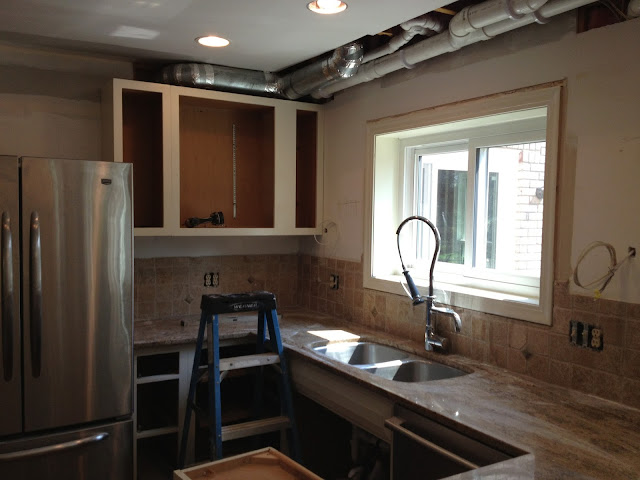
We started by removing all the upper cabinets off the walls and taking the soffits out (these are the drywall "ledge" above the old cabinets that typically house plumbing and electrical lines). 

Here is what it looked like after we removed those:
This picture was taken on day one - it all came apart quickly. We had not yet moved in, but were scheduled to move in this same week!
About a week later this was the scene. They had tucked all the electrical lines, plumbing lines and duct work as close to the floor joists as they could. We were planning to raise the cabinets about 3 inches more off the counters and top them with crown molding to hide the lines all running above. The upper cabinets and all the doors and drawers were off getting professionally painted. My husband , some friends and I took on the task of painting all the lower level cabinet boxes to save money. Man was that a job!!

You can also see here (especially if you compare it to the pic above) where we had them add a framed wall to the backside of the peninsula cabinets. This will be where the granite bar top sits a couple of weeks later - not quite ready for that at this point!

Here is day one of re-installing our cabinets. These are the same cabinets that were in before but they have been painted Sherwin Williams Muslin (this is the same color we used for the trim throughout the house). 
 Another project associated with the kitchen was this doorway. I wish I had a before shot of it, but I can't find one! :(  Anyway, it was a very narrow doorway with two little mini bi-fold doors attached. since you see this opening right when you walk in the front door and into the entry foyer I really wanted this to look nicer and have a better flow. Our reno team enlarged the doorway (to what you see here) making it taller and wider and then added a soft arch to the top to mimic the arch in the glass on my front door. It was a small quick project but made such a difference!


 And below are the finished pics:

From the kitchen looking into the entry.....
 And from the entry looking toward the kitchen......

Okay, so back to the kitchen its self:  Here is the first shot of the cabinets fully installed. Now waiting on the crown to come in!

 Couple of things to note: 

  • We had a dead space above the wall oven cabinet so we added a custom wine bottle holder there. 
  • Cabinet hardware was being changed out - notice the cabinets on the bottom and to the right have already been fitted with the new hardware. I went with the oil rubbed bronze through the house. 
  • The tumbled marble tile back splash was still in tact, but this would be replaced in the next week. 
  • Granite bar top was not yet installed as I was still looking for the perfect granite! 
Speaking of granite - below you can see the granite I finally decided on. I had taken my current counter top granite (we did not replace that and left it in tact from the old kitchen) "cutting board" and used it to see how the granites would look together in my kitchen.


This is the piece that I ended up purchasing - it was a remnant at a granite yard (yay - saved money!!). I wanted something that would contrast the existing granite, but also tie in and compliment nicely. This granite with the greys, black and chocolate in it was perfect. And it is SO sparkly!  It's like have a jewelry box on the bar :)
Above: Installation of the granite bar top!  I was so exciting when this came in and I could see it all together :)

Above: granite and glass tiles being installed. Wires coming out from under the cabinets will soon be supply electric to our under cabinet lighting!

And here are the finished pics - please let me know what you think and if you have any questions about any of the materials used please let me know. I am very cost conscience and would consider myself a "bargain shopper" - this project was no different. I went for quality, but found ways to do it on a budget for sure!


 And here is an old shot followed by the new version from pretty much the same angle:


 Love is a verb!  I love this :)

So to wrap it up and give you a bit of a list of what and where here you go:
  • Glass tile and granite tile backsplash - Lowe's Epoch Spectrum Desert Gold Mixed wall tile
  • "Cozumel" granite bar top via Alma Granite 
  • Most decor and window seat pillows via TJ Maxx and Home Goods
  • Cynthia Rowley upholstered bar stools with nail head trim  - TJ Maxx 
  • Pendant Lights - recycled from original kitchen...just relocated to over the new bar.
  • Appliances were in place with the exception of the fridge which was moved from our previous home.
  • Cabinet hardware via Lowe's
  • Wall color: Behr "Milk Chocolate" and Trim/Cabinet color Sherwin Williams "Muslin"


I hope you enjoyed the pics of my new/recycled kitchen! :)  
I would love to hear your thoughts, comments and questions! 

XO
Jessy 

Tuesday, August 6, 2013

OOTD - Polka Dots + Denim

I wanted to take a quick break from the posts about the new house and throw an outfit post in real quick.


Max Studio polka dot skirt via Marshall's / Wedges via TJ Maxx / Mossimo Denim Vest via Target / Tank via Loft / Kenneth Cole watch / Stella & Dot Renegade bracelet / Stella & Dot Luna wrap bracelet / Nine West Sunnies / O'Neill Floppy Sun hat (purchased at the marina water sports shop while at the lake house w/ friends a few weeks ago) - I loved the colors on it and the fit and size is exactly what I like which is remarkably hard to find when looking for a sun hat! :)

I am always in a sun hat if spending any length of time in the sun.  My husband and I decided to spend a little time reading out on the patio while our daughter was napping this past Sunday so I broke out the hat! It was a beautiful 70 degrees or so.....so perfect! 


I grabbed this great skirt a few weeks ago from Marshall's.  It is SO light and comfortable and is easily dressed up or down. I took a more causal approach to it with this outfit by topping it with a distressed denim vest. 
The best past about this outfit is that my 17 month old daughter was wearing a very similar skirt that day, as well (larger polka dots) and I did NOT plan it that way! It is just the outfit that I had laid out for her and I dressed her without really giving it any thought.  I really would have if I had thought about it in advance though so I had my husband snap a pic of us after church so I would have the moment captured :)

Thanks for taking a look and check back in the next couple of days for the kitchen update! I am dying to know what you all think about it :)

XO
Jessy 


Thursday, August 1, 2013

Another New Home update: Family Room

Hello All! 
Well, last week I gave you my first new house update with pics of my breakfast and hearth rooms. Today I wanted to share the family or living room with you (I call it one and my husband calls it the other).  We really spend the majority of our time in the kitchen and hearth room areas, but every now and then my husband will steal a few minutes of our favorite shows in the family room after the kids have gone to bed for the night.  

As with the rest of my home I wanted it to feel relaxed, warm, casual and inviting. I also wanted it to flow effortlessly into the hearth room and kitchen. 

When we purchased this home the owners were using this room as their office and sitting area. They had their family room in the back part of the house in a room that we turned into an incredible mudroom/office combo that we have named our "family center". We put a large wall of built in lockers for all the kids stuff (football equipment, backpacks, shoes, jackets, etc) and desks for computers a large island in the center of the room for homework, crafts, etc. Anyway we will get to that room in a later post!

So back to the family room; let me just get to it and show you some before and afters so you can see what we did in here :)


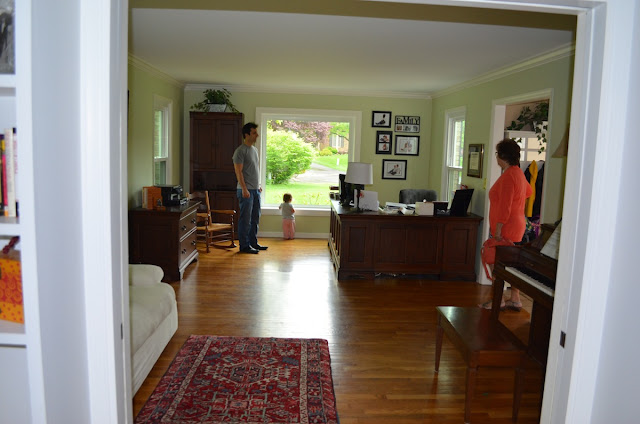
Here is a before (my baby girl, mother in law and husband are checking it out on one of our "tours" before buying).
And here is another one stepping a little further into the room and getting the back wall:

And (drum roll here :) is our take on the same space (several pics to follow):


We started with the wall color. It was a very pretty pale celadon green color but I just didn't like it for a room this large and for the atmosphere I was trying to create. We changed the wall color to Sherwin Williams "Nomadic Desert". This is the same color that runs throughout the main hallway and upstairs. We also painted all the trim in the same creamy off white that we had used through out the kitchen and hearth rooms called "Muslin" by SW.

The sofa is from Ikea (Ektorp Sofa) slipcovered sofa. You can get 10 or 15 different colors and fabric styles. I wanted light furniture but I knew with all the kids I had to do slipcovered furniture or I would have to replace it all in a couple of years.  The exception is the 2 Ballard Design leather chairs which will only get better with age and wipe clean with no problem :) 
 
The chest is an old pine chest that my mom picked up for me years ago.  I have extra pillows and blankets stored in there and it comes in very handy as a coffee table. It is also on wheels that roll so well so it is easy for us to roll right over to our large picture window and create an additional seating area as a window seat.
This piece has been everywhere in our numerous homes; bedrooms, in family rooms, breakfast room, etc. One of my favorite pieces of furniture and it gets around! :)


The canvas behind the sofa is also from Ikea. I purchased it several years ago, but they still carry it. I was surprised that I liked it so much in this home. It was in the great room at our previous house on a 2 story wall so I was afraid that it would overwhelm this space. I have to say I really love it here. It is such a soft and calming scene.
 

Side table and lamp are new purchases from Home Goods.  Both were on clearance. The side table matches the one in the hearth room next door.
The shag rug was a new purchase from Garden Ridge.  It is the softest rug ever! Same one as the hearth room rug just in a larger size and lighter color.  You could literally lay down and go to sleep on these rugs - they are amazing!  The perfect rug for playing on the floor with my daughter.


Pillows are all from Home Goods. Tray on chest was a very old purchase from a home interiors party.

 
 We bought matching leather chairs from Ballard Design outlet. This one is a fixed chair with an ottoman and the other chair on the other side of the sofa is my husband's recliner. He was so excited to finally get a great recliner to lay back and relax in :) These were steals from the outlet!  You can purchase them through the website here and here. They also come in this color which I love! Too bad they didn't have that at the outlet. 


Above my writing desk I plan to do a gallery wall of family photos.  It looks so naked right now....I am just happy to be as far along as I am with the house! :)
 

When I made my craigslist purchase of 6 parsons chairs (which I slip covered with cotton duck slip covers from Wayfair for only $15 per chair!) I used one of them at my writing desk to keep the seating through these three rooms consistent and it makes it really easy to grab an extra dinner chair when company comes over :)

*I have to take a second to sing the praises of Wayfair.com, too!  They were so great to deal with and I had a special request that with one phone call and no additional charge they accommodated. The customer service dept. was polite, friendly and very easy to work with. I would HIGHLY recommend checking them out for all your home décor needs. And, no they are NOT sponsoring this blog in any way!
 
I also grabbed this Ballard Design desk/sofa table off craigslist.com. I wanted something pretty low profile for this space and this was perfect!  I picked it up about 15 minutes from my house and $45!! :) You can see similar styles here and here.

 
 Above: my daughters Ikea chair. She loves to sit in this with a book - not that she can read, but it is so cute!  This chair is sturdy enough that even adults can sit in it - if they fit :) You can purchase one here.

The shade was custom fit to the the windows and I went with a top down/ bottom up design so we can still get the light with privacy. Next project is to decide what type of panels I am going to hang on all these windows?! I am going to hold off a bit on that I think, though. Let the bank account and my tired self recover a little while before starting any more projects! 


The tv stand is also Ikea. It is the Ikea Besta system. You can configure this system dozens of different ways, too!  I am waiting on the furniture legs that they forgot to deliver when they deliver and built the furniture. Did you know Ikea will deliver the furniture and deliver it on site?  At least they did from my Ikea store (we have one about 20 minutes from our home). It was SO worth it! I can't imagine building all the furniture!


I think that about sums this room up. If you have any questions or comments I would love to hear them! 
Thank you for taking a look and I hope you have an amazing week :)

XO
Jessy